| Note |
|---|
This web page is under construction. |
| Wiki Markup |
|---|
| Composition Setup |
| Note |
|---|
Help us improve the Bimplus API doc by providing your valuable comments. You can find the comment section at the bottom of the page. |
| Info | ||||||||||||||||||
|---|---|---|---|---|---|---|---|---|---|---|---|---|---|---|---|---|---|---|
Developers please use
|
Connect with Bimplus. Relation(workflow) between Bimplus portal and Bimplus api
Create, modify and access different resources/objects of the building model using the Bimplus api
Create a project, add some objects(walls, columnsan object(wall) and view it using the web viewer
Get the list of available projects and its properties
Add a thumbnail to the project
Project topology and object topology tree
Find the geometry of an object. Get to know the types of geometry available
Get the different properties / structure(normal, viewer properties, object in hierarchical tree structure) of the object using different property combinations
Get the project layers and Get the project layers and element types. Find the relation between them
Filter the building information using different filter criteria
Import an existing project model in the form of IFC/SketchUp file
Create and assign issues to projects. Locate/visualize the issues in the project
Learn about the issue based rights & roles
Add attachments to the whole building as well as to the individual objects
Find out how many teams I am part of. Remove myself from some of the teams
Authentication token for multiple logins and cross client authentication using temporary tokenservices
Rights & Roles. Relation between User, Team and Project
...
| Anchor | ||||
|---|---|---|---|---|
|
Connect with Bimplus. Relation(workflow) between Bimplus portal and Bimplus api
| Gliffy Diagram | ||||||||
|---|---|---|---|---|---|---|---|---|
|
-
is is the first place of contact of the user/developer for using the Bimplus platform. It includes a (stage version). The production version of the portal can be found underNewwindowlink title Bimplus portal url httphttps://www-stage.bimplus.net/
where where you can purchase different editions of Bimplus cloud platform.Newwindowlink title shop url httphttps://www.bimplus.net/en/Apps/bim-Shopproducts/
you you can also find a few critical foundation apps like the Bimplus Explorer, Bimplus Viewer and Bimplus Problem Spotter. The portal takes care of the user registration(developer registration) as well.Newwindowlink title Here url httphttps://www.bimplus.net/en/AppsHome-oxid/bim-Apps/ - The Bimplus API(development version url : https://api-stage.bimplus.net/v2) provides an interface for accessing the building information and models. It connects the building project information to a vast number of developers providing innovative Apps / applications that can operate on the building models and information.
The figure below describes the relation between the Bimplus portal and the API.
...
| Anchor | ||||
|---|---|---|---|---|
|
Become a Bimplus compliant developer/partner. Register and authorize yourself to access the Bimplus resources. Relation between teams and projects
| Gliffy Diagram | ||||||||
|---|---|---|---|---|---|---|---|---|
|
- Please register register
forNewwindowlink title here url httphttps://www-stage.bimplus.net/en/open-account/
for accessing the Bimplus resources and become a Bimplus compliant developer and a partner. You will receive an authentication token after the registration. - A Team is a tenant/company which work on the projects. The team has to be specified and setup through the the
portal portal as so called calledNewwindowlink title bimplus url httphttps://www-stage.bimplus.net/
to to present a aNewwindowlink title slugs url http://en.wikipedia.org/wiki/Clean_URL#Slug/URL
. The team slug will be used to know which tenant database to work on.Newwindowlink title clean URL url http://en.wikipedia.org/wiki/Clean_URL/ - Using the authentication token and the team slug, you can start working with the building projects which you are a member of, using our Bimplus api.
- Please find a quick start tutorial tutorial
.Newwindowlink title here url 1.1.2+Quick+Start+Guide
...
| Anchor | ||||
|---|---|---|---|---|
|
Create a team. Create an user. Assign the newly created user to the newly created team. Verify whether he/she is part of the team
| Gliffy Diagram | ||
|---|---|---|
|
...
|
The Bimplus provides a few user administration relevant services. They are:
...
- User Management Service
- Team Management Service
- Membership Management Service
- Please use the Bimplus Team Management Service (POST https://api-stage.bimplus.net/v2/teams) for creating a team. This will basically create a data storage for the team. See in the Request/Response tab where we have created the "best-company" team. Also, please note that the team slug "best-company" will be part of the subsequent requests for accessing the resources and performing the desired actions on them.
- Create a new user using the Bimplus User Management Service(POST https://api-stage.bimplus.net/v2/users).
- Add the user which you have created to the team using the Bimplus Membership Management Service(POST https://api-stage.bimplus.net/v2//members).
- Verify whether the user has been added to the team by using the Bimplus Membership Management Service(GET https://api-stage.bimplus.net/v2//members). In the response tab, you can see the user(test@bimplus.net) who is part of the "best-company" team.
- For authorization, user should perform OIDC authentication and receive token (preferrably within browser UI)
...
| Anchor | ||||
|---|---|---|---|---|
|
Create, modify and access different resources/objects of the building model using the Bimplus api
| Gliffy Diagram | ||||||||
|---|---|---|---|---|---|---|---|---|
|
The project slug (which should be provided during the creation of a project) should be provided as part of the URL for accessing all the project relevant resources. This is also necessary to verify the user’s access rights on the project in an early stage of processing the API call (before any business data will be touched and any business logic will be executed)
These are the project relevant services available at the moment:
- Project Service
- Object Service
- ElementType Service
- Division Service
- Attachment Service
- Issue Service
- Pin Service
- Import Service
For further details see the Bimplus api reference
...
| Anchor | ||||
|---|---|---|---|---|
|
Create a project, add
...
an object(wall) and view it using the web viewer
| Gliffy Diagram | ||||||||
|---|---|---|---|---|---|---|---|---|
|
1. Create a new project
Use the Bimplus Project Service for creating a new project.
| Wiki Markup |
|---|
{deck:id=bimCreateProject} |
| Wiki Markup |
|---|
{card:label=HTTP Method} |
POST
| Wiki Markup |
|---|
{card} |
| Wiki Markup |
|---|
{card:label=URL / Resource / JSON Structure|default=true} |
| Deck of Cards | ||||||||||||||||||||||||||
|---|---|---|---|---|---|---|---|---|---|---|---|---|---|---|---|---|---|---|---|---|---|---|---|---|---|---|
| ||||||||||||||||||||||||||
|
...
...
|
...
|
| Wiki Markup |
|---|
{card} |
| |||||||||||||||||||||||||||||||||||||||||||||||||||||||||||||
| Wiki Markup | |||||||||||||||||||||||||||||||||||||||||||||||||||||||||||||
|---|---|---|---|---|---|---|---|---|---|---|---|---|---|---|---|---|---|---|---|---|---|---|---|---|---|---|---|---|---|---|---|---|---|---|---|---|---|---|---|---|---|---|---|---|---|---|---|---|---|---|---|---|---|---|---|---|---|---|---|---|---|
{card:label=Request}
| |||||||||||||||||||||||||||||||||||||||||||||||||||||||||||||
| |||||||||||||||||||||||||||||||||||||||||||||||||||||||||||||
| Wiki Markup | |||||||||||||||||||||||||||||||||||||||||||||||||||||||||||||
|
| Wiki Markup |
|---|
{card} |
| Wiki Markup |
|---|
{deck} |
...
2. Create a topology node
...
A Topology node has to be created for adding the objects (Column, Wall). As a topology node is also an object, the Bimplus Object Service has to be used for creating the topology object. Please see the request tab. The id of the project is provided for the parent attribute of the json object(topology)
| Wiki Markup |
|---|
{deck:id=bimGetObject1} |
| Wiki Markup |
|---|
{card:label=HTTP Method} |
POST
| Wiki Markup |
|---|
{card} |
| Wiki Markup |
|---|
{card:label=URL / Resource / JSON Structure|default=true} |
Resource: objects
2. Create a model under the project
| Deck of Cards | ||||||||||||
|---|---|---|---|---|---|---|---|---|---|---|---|---|
| ||||||||||||
|
...
|
...
|
...
|
...
|
...
|
...
...
|
...
|
...
type
...
|
...
|
...
|
...
|
...
|
...
|
...
|
...
|
...
Object
...
Children of the object
|
| Wiki Markup |
|---|
{card} |
| Wiki Markup |
|---|
{card:label=Description} |
| Wiki Markup |
|---|
{card} |
| Wiki Markup | ||||||||||||||||||||||||||||||||||||||||||||||||||||||||||||||||||||
|---|---|---|---|---|---|---|---|---|---|---|---|---|---|---|---|---|---|---|---|---|---|---|---|---|---|---|---|---|---|---|---|---|---|---|---|---|---|---|---|---|---|---|---|---|---|---|---|---|---|---|---|---|---|---|---|---|---|---|---|---|---|---|---|---|---|---|---|---|
{card:label=Request}
|
| Wiki Markup |
|---|
{card} |
| Wiki Markup |
|---|
{card:label=Response} |
|
3. Create a topology node
A Topology node has to be created for adding the objects (Column, Wall). As a topology node is also an object, the Bimplus Object Service has to be used for creating the topology object. Please see the request tab. The id of the project is provided as the parent of the topology node object. The model id has to be provided as the "divisionid" attribute.
| Deck of Cards | |||||||||||||||||||||||||||||||||||||||||||||||||||||||||||||||||||||||||||||||||||||
|---|---|---|---|---|---|---|---|---|---|---|---|---|---|---|---|---|---|---|---|---|---|---|---|---|---|---|---|---|---|---|---|---|---|---|---|---|---|---|---|---|---|---|---|---|---|---|---|---|---|---|---|---|---|---|---|---|---|---|---|---|---|---|---|---|---|---|---|---|---|---|---|---|---|---|---|---|---|---|---|---|---|---|---|---|---|
| |||||||||||||||||||||||||||||||||||||||||||||||||||||||||||||||||||||||||||||||||||||
| |||||||||||||||||||||||||||||||||||||||||||||||||||||||||||||||||||||||||||||||||||||
| Code Block | |||||||||||||||||||||||||||||||||||||||||||||||||||||||||||||||||||||||||||||||||||||
| |||||||||||||||||||||||||||||||||||||||||||||||||||||||||||||||||||||||||||||||||||||
Status: 201 Created
|
| Wiki Markup |
|---|
{card} |
| Wiki Markup |
|---|
{deck} |
...
|
4. Add a wall to the project
Again we use the Bimplus Object Service for creating the wall object in the project. Please note that the wall is added to the topology node and not the project (i.e See the request tab. The id of the topology node is provided for the parent attribute of the json object(wall))
| Wiki Markup |
|---|
{deck:id=bimGetObject1} |
| Wiki Markup |
|---|
{card:label=HTTP Method} |
POST
| Wiki Markup |
|---|
{card} |
| Wiki Markup |
|---|
{card:label=URL / Resource / JSON Structure|default=true} |
| Deck of Cards | ||||||||||||||||||||||||||||||
|---|---|---|---|---|---|---|---|---|---|---|---|---|---|---|---|---|---|---|---|---|---|---|---|---|---|---|---|---|---|---|
| ||||||||||||||||||||||||||||||
|
...
...
|
...
| Wiki Markup |
|---|
{card:label=Description} |
...
|
| Wiki Markup |
|---|
{card} |
| |||||||||||||||||||||||||||||||||||||||||||||||||||||||||||||||||||||||||||||||||||||||||||||||
| Wiki Markup | |||||||||||||||||||||||||||||||||||||||||||||||||||||||||||||||||||||||||||||||||||||||||||||||
|---|---|---|---|---|---|---|---|---|---|---|---|---|---|---|---|---|---|---|---|---|---|---|---|---|---|---|---|---|---|---|---|---|---|---|---|---|---|---|---|---|---|---|---|---|---|---|---|---|---|---|---|---|---|---|---|---|---|---|---|---|---|---|---|---|---|---|---|---|---|---|---|---|---|---|---|---|---|---|---|---|---|---|---|---|---|---|---|---|---|---|---|---|---|---|---|
{card:label=Request}
|
| Wiki Markup |
|---|
{card} |
| Wiki Markup |
|---|
{card:label=Response} |
| Code Block | ||||||
|---|---|---|---|---|---|---|
| ||||||
Status: 201 Created
|
| Code Block | |||||||||||||||||||||||||||||||||||||||||||||||||||||||||||||||||||||||||||||||||||||
|---|---|---|---|---|---|---|---|---|---|---|---|---|---|---|---|---|---|---|---|---|---|---|---|---|---|---|---|---|---|---|---|---|---|---|---|---|---|---|---|---|---|---|---|---|---|---|---|---|---|---|---|---|---|---|---|---|---|---|---|---|---|---|---|---|---|---|---|---|---|---|---|---|---|---|---|---|---|---|---|---|---|---|---|---|---|
| |||||||||||||||||||||||||||||||||||||||||||||||||||||||||||||||||||||||||||||||||||||
{
"id": "921bc1f6-228a-4f79-937a-0251b60436b4",
"type": "Wall"
|
| Wiki Markup |
|---|
{card} |
| Wiki Markup |
|---|
{deck} |
...
4. Add a column to the project
...
Again we use the Bimplus Object Service for creating the column object in the project. Please note that the wall is added to the topology node and not the project (i.e See the request tab. The id of the topology node is provided for the parent attribute of the json object(wall))
| Wiki Markup |
|---|
{deck:id=bimGetObject1} |
| Wiki Markup |
|---|
{card:label=HTTP Method} |
POST
| Wiki Markup |
|---|
{card} |
| Wiki Markup |
|---|
{card:label=URL / Resource / JSON Structure|default=true} |
Resource: objects
URL: https://api.bimplus.net/v2/<team>/objects
Example: https://api.bimplus.net/v2/bimplus/objects
JSON Structure:
Name | Mandatory / Optional | Type | Description |
|---|---|---|---|
parent | optional | string (guid) | The id of the parent to which the object can be associated |
type | mandatory | string | Element type of the object |
attributes | optional | string | Attributes of the object |
children | optional | Object | Children of the object |
| Wiki Markup |
|---|
{card} |
| Wiki Markup |
|---|
{card:label=Description} |
| Wiki Markup |
|---|
{card} |
| Wiki Markup |
|---|
{card:label=Request} |
| Code Block | ||||||
|---|---|---|---|---|---|---|
| ||||||
Authorization: BimPlus 9c1874a62c974dcfa75e0132c423a088
Content-Type: application/json
|
| Code Block | ||||||||||||||||||||||||||||||||||||||||||||||||||||
|---|---|---|---|---|---|---|---|---|---|---|---|---|---|---|---|---|---|---|---|---|---|---|---|---|---|---|---|---|---|---|---|---|---|---|---|---|---|---|---|---|---|---|---|---|---|---|---|---|---|---|---|---|
| ||||||||||||||||||||||||||||||||||||||||||||||||||||
{
"parent" : "7f76a497-e322-4b78-b820-1ce85ebc39db",
"type": "Column",
"attributes": {
|
| Wiki Markup |
|---|
{card} |
| Wiki Markup |
|---|
{card:label=Response} |
| Code Block | ||||||
|---|---|---|---|---|---|---|
| ||||||
Status: 201 Created
|
| Code Block | ||||||||||||||||||||||||||||||||||||||||||||||
|---|---|---|---|---|---|---|---|---|---|---|---|---|---|---|---|---|---|---|---|---|---|---|---|---|---|---|---|---|---|---|---|---|---|---|---|---|---|---|---|---|---|---|---|---|---|---|
| ||||||||||||||||||||||||||||||||||||||||||||||
{
"id": "de5a8d7e-701f-42ff-9731-f32fb1fb767d",
"type": "Column"
|
| Wiki Markup |
|---|
{card} |
| Wiki Markup |
|---|
{deck} |
...
5. Verify whether the wall and column is added to the project by seeing the object topology
For verifying whether the wall and the column is added to the project, we have to call GET https://api-stage.bimplus.net/v2/nemetschek/objects//topology. Please note that the API call GET https://api-stage.bimplus.net/v2/nemetschek/projects//topology will only give you its children (i.e topology) details. So, if your project is very big, you can first call GET https://api-stage.bimplus.net/v2/nemetschek/projects//topology and get the topology id(i.e 7f76a497-e322-4b78-b820-1ce85ebc39db in our example). Using the topology id we can get the object(wall, column in our case) details using the call GET https://api-stage.bimplus.net/v2/nemetschek/objects/7f76a497-e322-4b78-b820-1ce85ebc39db/topology.
| Wiki Markup |
|---|
{deck:id=bimGetProjectProp} |
| Wiki Markup |
|---|
{card:label=HTTP Method} |
GET
| Wiki Markup |
|---|
{card} |
| Wiki Markup |
|---|
{card:label=URL / Resource / JSON Structure|default=true} |
| Deck of Cards | ||||||||||
|---|---|---|---|---|---|---|---|---|---|---|
| ||||||||||
|
...
|
...
|
...
|
...
|
...
|
...
|
...
|
...
| Wiki Markup |
|---|
{card:label=Description} |
...
|
...
| |||||||||||||||||
| Wiki Markup | |||||||||||||||||
|---|---|---|---|---|---|---|---|---|---|---|---|---|---|---|---|---|---|
|
| Wiki Markup |
|---|
{card} |
| |||||||||||||||||||||||||||||||||||||||||||||||||||||||||||||||||||||||||||||||||||||||
| Wiki Markup | |||||||||||||||||||||||||||||||||||||||||||||||||||||||||||||||||||||||||||||||||||||||
|---|---|---|---|---|---|---|---|---|---|---|---|---|---|---|---|---|---|---|---|---|---|---|---|---|---|---|---|---|---|---|---|---|---|---|---|---|---|---|---|---|---|---|---|---|---|---|---|---|---|---|---|---|---|---|---|---|---|---|---|---|---|---|---|---|---|---|---|---|---|---|---|---|---|---|---|---|---|---|---|---|---|---|---|---|---|---|---|
{card:label=Response}
|
| Wiki Markup |
|---|
{card} |
| Wiki Markup |
|---|
{deck} |
|
6. See your result visually by using the web viewer.

...
| Anchor | ||||
|---|---|---|---|---|
|
Get the list of available projects and its properties
| Gliffy Diagram | ||||||||
|---|---|---|---|---|---|---|---|---|
|
- This API call(GET https://api-stage.bimplus.net/v2//projects) should retrieve the list of projects available to the team. In this call, only a few properties of the projects will be visible.
- Using the project id got from the previous call, the full property list can be accessed using this API call(GET https://api-stage.bimplus.net/v2//projects/)
...
| Anchor | ||||
|---|---|---|---|---|
|
Add a thumbnail to the project
| Gliffy Diagram | ||||||||
|---|---|---|---|---|---|---|---|---|
|
- Thumbnail can be added to a project by using the Bimplus Project Service(POST https://api-stage.bimplus.net/v2//projects//thumbnail). There is also a service available for downloading the thumbnail.
...
| Anchor | ||||
|---|---|---|---|---|
|
Add properties to the project
| Gliffy Diagram | ||||||||
|---|---|---|---|---|---|---|---|---|
|
- The project can be updated with the necessary attributes. The list of available Bimplus attributes can be seen here
- Update the project with the project properties
| Wiki Markup |
|---|
{deck:id=bimUpdateProject} |
| Wiki Markup |
|---|
{card:label=HTTP Method} |
PUT
| Wiki Markup |
|---|
{card} |
| Wiki Markup |
|---|
{card:label=URL / Resource / JSON Structure|default=true} |
| Deck of Cards | ||||||||||||||||||||||||||||||
|---|---|---|---|---|---|---|---|---|---|---|---|---|---|---|---|---|---|---|---|---|---|---|---|---|---|---|---|---|---|---|
| ||||||||||||||||||||||||||||||
| ||||||||||||||||||||||||||||||
| Wiki Markup | ||||||||||||||||||||||||||||||
|
| Wiki Markup |
|---|
{card:label=Description} |
...
|
| Wiki Markup |
|---|
{card} |
| Wiki Markup |
|---|
{card:label=Request} |
| Code Block | ||||||
|---|---|---|---|---|---|---|
| ||||||
Authorization: BimPlus 9c1874a62c974dcfa75e0132c423a088
Content-Type: application/json
|
|
- See the updated project properties
| Deck of Cards | ||||||||||||||||||||||||||||||||||||||||||||||||||||||
|---|---|---|---|---|---|---|---|---|---|---|---|---|---|---|---|---|---|---|---|---|---|---|---|---|---|---|---|---|---|---|---|---|---|---|---|---|---|---|---|---|---|---|---|---|---|---|---|---|---|---|---|---|---|---|
| ||||||||||||||||||||||||||||||||||||||||||||||||||||||
|
| Anchor | ||||
|---|---|---|---|---|
|
Project topology and object topology tree
| Gliffy Diagram | ||||||||
|---|---|---|---|---|---|---|---|---|
|
Topology is a hierarchical tree representing all its child nodes. A topology tree consist of components which can have a graphical representation(objects or elements) or components which does not have a graphical representation(nodes). A topology tree can be obtained both on the project as well as on the object level.
- Please use the Bimplus Project Service for obtaining/filtering the project topology tree. This will yield the topology nodes filtered till the sub-project level.
| Section | ||||||||||||||||||||||
|---|---|---|---|---|---|---|---|---|---|---|---|---|---|---|---|---|---|---|---|---|---|---|
|
- Please use the Bimplus Object Service for obtaining/filtering the object topology tree. This will yield the topology nodes with all the properties, attributes, geometry and children.
| Section | ||||||||||||||||||||||
|---|---|---|---|---|---|---|---|---|---|---|---|---|---|---|---|---|---|---|---|---|---|---|
|
- A project is basically an object. For a better understanding, here the same project is represented using the different API calls.
| Section | ||||||||||||||||||||||
|---|---|---|---|---|---|---|---|---|---|---|---|---|---|---|---|---|---|---|---|---|---|---|
|
| Section | ||||||||||||||||||||||
|---|---|---|---|---|---|---|---|---|---|---|---|---|---|---|---|---|---|---|---|---|---|---|
|
...
| Anchor | ||||
|---|---|---|---|---|
|
Find the geometry of an object. Get to know the types of geometry available
| Gliffy Diagram | ||||||||
|---|---|---|---|---|---|---|---|---|
|
The geometrical information(graphical representation) of a building can be accessed through the Bimplus Object Service. There are different types of geometry available for optimizing and viewing on different devices.
There are three type of Geometry objects.
- mesh: It is the default geometry type. It is an uncompressed mesh format where the geometry object will be compressed on the server before storing it into the database. Please use this API call(GET https://api-stage.bimplus.net/v2//objects/) for getting the mesh information of an object.
| Code Block | ||||||
|---|---|---|---|---|---|---|
| ||||||
{
"id": "7cf910cb-e357-43f6-aa3a-b45c26380f75",
"type": "Wall",
"attributes": {
"element": {
"isparent": true,
"nr": 0,
"matrix": "AAAAAAAA8D8AAAAAAAAAgAAAAAAAAACAINejcP1YsEAAAAAAAAAAgAAAAAAAAPA/AAAAAAAAAIAK16Nw/fy
2QAAAAAAAAACAAAAAAAAAAIAAAAAAAADwPwAArkfheoS/AAAAAAAAAAAAAAAAAAAAAAAAAAAAAAAAAAAAAAAA8D8=",
"elementtyp": "10074eef-9418-4d64-9c6d-23932835a7f1",
"logparentid": "0d2ce2cc-3588-45d6-a59a-f6b89ebed34e",
"divisionid": "ac21b9a1-8853-4658-9fbf-0cf62340bd18"
},
"general": {
"name": "Updated_Brickwall",
"isobjectvalid": true
},
"allplan": {
"allplan_guid": "08b8195a-a2ad-11e2-9993-002215ea7d6b",
"allplan_id": 2065507287,
"allplan_text": "<PP>Wall",
"dateofexport": "2013-05-01T09:32:13"
},
"geometry": {
"mesh": "{\"C\":0,\"V\":[4450.01,115.01,0.01,3200.01,115.01,0.01,3200.01,0.01,0.01,4450.01,0.01,0.01,2315.01,
0.01,0.01,2315.01,115.01,0.01,0.01,115.01,0.01,0.01,0.01,0.01,4450.01,115.01,2750.01,4450.01,0.01,
2750.01,0.01,0.01,2750.01,0.01,115.01,2750.01,2315.01,115.01,2190.01,3200.01,115.01,2190.01,3200.01,
0.01,2190.01,2315.01,0.01,2190.01],\"F\":[4,0,1,2,3,4,4,5,6,7,4,8,9,10,11,4,0,3,9,8,8,6,5,12,13,1,0,
8,11,4,7,6,11,10,8,3,2,14,15,4,7,10,9,4,12,15,14,13,4,15,12,5,4,4,13,14,2,1]}"
}
}
}
|
- meshblob: It is a compressed mesh format intended to be used in the desktop CAD applications. Internal CAD format of the geometry will be converted into a Bimplus compressed mesh format with the help of a DLL in order to minimize the JSON object. Please use this API call(GET https://api-stage.bimplus.net/v2//objects//geometries/meshblob) for getting the meshblob information of an object.
| Code Block | ||||||
|---|---|---|---|---|---|---|
| ||||||
{
"elementsCount": 1,
"objects": [
{
"id": "7cf910cb-e357-43f6-aa3a-b45c26380f75",
"parent": "00000000-0000-0000-0000-000000000000",
"type": "Wall",
"attributes": {
"geometry": {
"compress": true,
"picture": "H4sIAAAAAAAEANVXW3PbRBTWylIsuUmctml6T900t7aua+eetiHOndAQDLS8pBnhyzYVUeQiyR0cGJ545y9QGB
54YYY3HvkXPPetQLlDuV/2E7uqiEfUMzRDkWc/zfl0tHvO2XPOWhKRJOkPduGOq1VmcLVQmPE8xywVzLJXc+iV+k06nE69QB3Xr
NpTQ9lcLpPNjExmxzIjufHRbDo1V7OgOGXTmucUrXSqUCtZZvkyrV+pblJ7yq5Zloo10qt0i3pu+QbdzKxe9UxrxSw5RaeemZstunT
BYk9tr1C16rRCnTh7Qb1ZNW1PoZUNqlwvlqm2ZTxXrJg1t33LmKV2xbQ3nKplUcVjRsrL87FYTFGU2G3yfN316FZmDg/LHrPbzSxRm
zpmObNiut6LubW1SFsCO9jSzJfdiMb6+luPwsQFFpfH28JFtmm7ZmFP5OrVmu3NOE6xjoRuUq03Sk0kJMyG4h4el6WaWYGsxwAKQGWQ
SKg/s5pqajoURfxW0apRw5A0TBbrkCTlJ/Z+eJU97IFsFGWjJBtl2ajIBpWN67KxIRs3ZMOUjZdkY1N6cGnxuMwvacelwNj/QX3AzBb
DZEa6quGa21Qzbv01Jwv0QFO2ra3De03TNXbr4EPBPj3+xfeP7vc3Y1rgvc5uh/hQ1Efl/a4W9r/zHqYF3idQkXzEkQgSEZnQ11QW+R
WOAtRbAW2AdkASgIn0vYB9gP2ATsABQBfgIADB1w8DjsAQXRiSgiGRrSK8n74dRwHHAMcB3YATAMyjnwT0AE4BegF9gH7AAGAQcBpwB
nAWkAacA2QA5wFZQA4wxKBNiyf+FrqHWow98C0eBowARgFjgHHABGAScAFwEXAJa7WoiHZzm4NEIa+QOtlGxrS0YMn7g9felEsf5F+e
Snz8zkfX8q92vr90Z/uNaYL9w9T3nv2wW5Xea1Ro26EgHgQK7VxBLNGgkAzP0PV2o0LHDoUGG/ZyBUE0KOzbodCwxP4dRooZ/CVfezd
POiO8CBQORCwRKHRFGBkoHIxw05eP3c6TQxF7ESgcjtiLQOFIRKiFgopaabqy1BLdMO0Y+0uJriHzXPfvKLejXPDz7TgnIOA0Id2cUPh
r5AQn0G1bQKQ4AQH/a8lJTkBAVyI9nND4a+QUJ9AqUHyklxMJ7jjp4wQE5Dbp50Qrf40MhAzz5xgMTepbejpkGNKfnOEEBKQ7OcuJdhG
PdGgV35dzITt8XzKhAKEiyHlOQEAFkCwnOoS3udCyvsZQ6BUsrQ43s51oO/BLxReDG3u9iYOOqyzb3vBQOrXllquOZZYeHGIj7ARjv4c
fXaXx8eJoeXQsNzk8QrMTk+v+EaRPwRs0QL8TPgFpVEjTkMaElIc0LqQZSBNCmoU0KaQ5SBeENA/popAWIF0S0iJ2Hyb8x6GIPtHjKDh
NX+Jp6tcQogSj9SfD7LRgl8NsXrBPhdkZwV7mSekn5qxgV8K6c4J9Oqw7L9jVsO6CYJ8Js4uCLYTYpHBJE61ENIykcEsTDUK0gaRwTRN
lL4o7KdzTfmUfByiTH9gdlZEMXMRnhygxnCP4tP+Gje/YwLGRFG5r+MD4go3v2cB5kQxc/40xOCBwBqDN/8jkz9m4z8a3mF+EQ0OP/4w
xaOVf4YkIifYJk75m4xc2PsUTERbtLpPusfE7G1/iI+dPBQ0gCIMQAAA=",
"type": 3,
"matrix": "AAAAAAAA8D8AAAAAAAAAgAAAAAAAAACAINejcP1YsEAAAAAAAAAAgAAAAAAAAPA/AAAAAAAAAIAK16Nw/fy2QAAAAAAAAACAAAAAAAAAAIAAAAAAAA
DwPwAArkfheoS/AAAAAAAAAAAAAAAAAAAAAAAAAAAAAAAAAAAAAAAA8D8="
}
}
}
]
}
|
- threejs: It is a format which is optimized for viewing on mobile devices or in browsers where the native model is filtered and tessellated in order to deliver minimal JSON size and maximal navigation speed (FPS). This model has ThreeJS JSON v 3.1 format and can be directly parsed by the client.Please use this API call(GET https://api-stage.bimplus.net/v2//objects//geometries/threejs) for getting the threejs information of an object.
| Code Block | ||||||
|---|---|---|---|---|---|---|
| ||||||
{
"elementsCount": 1,
"viewbox": {
"x": -5081.562,
"y": 5005.8785,
"z": 1231.1029999999996,
"width": 5950,
"height": 5540.835,
"depth": 7065.71
},
"colors": [
-9868951
],
"objects": [
{
"id": "f5cc3c6c-1fdf-499d-a38d-0582adadc216",
"type": "RoofLayer",
"attributes": {
"geometry": {
"threejs": {
"faces": [
0,
2,
1,
3,
0,
5,
3,
9,
1,
1,
14,
1,
5,
6,
15,
12,
1,
7,
4,
13,
14
],
"vertices": [
-2106.562,
7588.114,
-2301.752,
-8056.562,
7588.114,
-2301.752,
-8056.562,
-880.999,
-4742.212,
6700,
-880.999,
-4742.212,
7412.539,
-1821.578,
-5522.212,
7412.539,
-1821.578
],
"metadata": {
"formatVersion": 3,
"colorid": 0
}
}
},
"quantity": {
"length": 7065.71,
"height": 150,
"volume": 7911354818.818842,
"area": 52742365.4587924
},
"general": {
"name": "<PP>RoofLayer"
}
}
}
]
}
|
...
| Anchor | ||||
|---|---|---|---|---|
|
Get the different properties / structure(normal, viewer properties, object in hierarchical tree structure) of the object using different property combinations
| Gliffy Diagram | ||||||
|---|---|---|---|---|---|---|
|
Different properties / structure (normal, viewer properties, object in hierarchical tree structure) of the object can be obtained using different property combinations.
url: /geometries/threejs/properties/{props}
where props can be 1, 2 or 3.
/geometries/threejs/properties/1 : show objects as hierarchical tree ( default (/geometries/threejs or /geometries/threejs/properties/0 will give the object details in a flat structure))
/geometries/threejs/properties/2 : show also viewer attributes
/geometries/threejs/properties/3 : include FACE_NORMAL
You can also combine different property numbers
eg: geometries/threejs/properties/4 should give both the show objects as tree(1) + add FACE_NORMAL in threeJs json(3)
| Deck of Cards | ||||||||||||||||||||||||||||||||||||||||||||||||||||||
|---|---|---|---|---|---|---|---|---|---|---|---|---|---|---|---|---|---|---|---|---|---|---|---|---|---|---|---|---|---|---|---|---|---|---|---|---|---|---|---|---|---|---|---|---|---|---|---|---|---|---|---|---|---|---|
| ||||||||||||||||||||||||||||||||||||||||||||||||||||||
|
geometries/threejs/properties/7 should give you a combination of objects as tree(1) + viewer attributes(2) + face normal(3)
| Deck of Cards | ||||||||||||||||||||||||||||||||||||||||||||||||||||||
|---|---|---|---|---|---|---|---|---|---|---|---|---|---|---|---|---|---|---|---|---|---|---|---|---|---|---|---|---|---|---|---|---|---|---|---|---|---|---|---|---|---|---|---|---|---|---|---|---|---|---|---|---|---|---|
| ||||||||||||||||||||||||||||||||||||||||||||||||||||||
| ||||||||||||||||||||||||||||||||||||||||||||||||||||||
| Code Block | ||||||||||||||||||||||||||||||||||||||||||||||||||||||
| ||||||||||||||||||||||||||||||||||||||||||||||||||||||
{
"properties": {
"MainFloorArea": "456m²",
"Architect": {
|
| Wiki Markup |
|---|
{card} |
| Wiki Markup |
|---|
{card:label=Response} |
| Code Block | ||||||
|---|---|---|---|---|---|---|
| ||||||
Status: 200 OK
|
| Wiki Markup |
|---|
{card} |
| Wiki Markup |
|---|
{deck} |
- See the updated project properties
| Wiki Markup |
|---|
{deck:id=bimGetProjectProp} |
| Wiki Markup |
|---|
{card:label=HTTP Method} |
GET
| Wiki Markup |
|---|
{card} |
| Wiki Markup |
|---|
{card:label=URL / Resource / JSON Structure|default=true} |
Resource: projects/<project_id>
URL: https://api.bimplus.net/v2/<team>/projects/<project_id>
Example: https://api.bimplus.net/v2/bimplus/projects/586b02be-43b8-4e27-b698-e067e85e38e2
| Wiki Markup |
|---|
{card} |
| Wiki Markup |
|---|
{card:label=Description} |
| Wiki Markup |
|---|
{card} |
| Wiki Markup |
|---|
{card:label=Request} |
| Code Block | ||||||
|---|---|---|---|---|---|---|
| ||||||
Authorization: BimPlus 9c1874a62c974dcfa75e0132c423a088
Content-Type: application/json
|
| Wiki Markup |
|---|
{card} |
| Wiki Markup |
|---|
{card:label=Response} |
| Code Block | ||||||
|---|---|---|---|---|---|---|
| ||||||
Status: 200 OK
|
| Code Block | ||||||
|---|---|---|---|---|---|---|
|
...
Project topology and object topology tree
| Gliffy Diagram | ||||
|---|---|---|---|---|
|
Topology is a hierarchical tree representing all its child nodes. A topology tree consist of components which can have a graphical representation(objects or elements) or components which does not have a graphical representation(nodes). A topology tree can be obtained both on the project as well as on the object level.
- Please use the Bimplus Project Service for obtaining/filtering the project topology tree. This will yield the topology nodes filtered till the sub-project level.
| Section | ||||||||||||||||||||||||||||||||||||||||||||||||||||||||||||||||||||||||||||||||
|---|---|---|---|---|---|---|---|---|---|---|---|---|---|---|---|---|---|---|---|---|---|---|---|---|---|---|---|---|---|---|---|---|---|---|---|---|---|---|---|---|---|---|---|---|---|---|---|---|---|---|---|---|---|---|---|---|---|---|---|---|---|---|---|---|---|---|---|---|---|---|---|---|---|---|---|---|---|---|---|---|
{
"name": "Your Awesome Building",
"shortDescr": "The example project",
"thumbnail": "/nemetschek/projects/0d2ce2cc-3588-45d6-a59a-f6b89ebed34e/thumbnail/download",
"created": "0001-01-01T00:00:00",
"changed": "0001-01-01T00:00:00",
"disciplines": [
|
| Wiki Markup |
|---|
{card} |
| Wiki Markup |
|---|
{deck} |
...
|
- Please use the Bimplus Object Service for obtaining/filtering the object topology tree. This will yield the topology nodes with all the properties, attributes, geometry and children.
| Section | ||||||||||||||||||||||
|---|---|---|---|---|---|---|---|---|---|---|---|---|---|---|---|---|---|---|---|---|---|---|
|
- A project is basically an object. For a better understanding, here the same project is represented using the different API calls.
| Section | ||||||||||||||||||||||
|---|---|---|---|---|---|---|---|---|---|---|---|---|---|---|---|---|---|---|---|---|---|---|
| ||||||||||||||||||||||
| Section | ||||||||||||||||||||||
|
...
Find the geometry of an object. Get to know the types of geometry available
| Gliffy Diagram | ||||
|---|---|---|---|---|
|
The geometrical information(graphical representation) of a building can be accessed through the Bimplus Object Service. There are different types of geometry available for optimizing and viewing on different devices.
There are three type of Geometry objects.
- mesh: It is the default geometry type. It is an uncompressed mesh format where the geometry object will be compressed on the server before storing it into the database. Please use this API call(GET https://api.bimplus.net/v2//objects/) for getting the mesh information of an object.
| Code Block | ||||||||||||||||||||||||||||||||||||||||||||||||||||||||||||||||
|---|---|---|---|---|---|---|---|---|---|---|---|---|---|---|---|---|---|---|---|---|---|---|---|---|---|---|---|---|---|---|---|---|---|---|---|---|---|---|---|---|---|---|---|---|---|---|---|---|---|---|---|---|---|---|---|---|---|---|---|---|---|---|---|---|
| ||||||||||||||||||||||||||||||||||||||||||||||||||||||||||||||||
{
"id": "7cf910cb-e357-43f6-aa3a-b45c26380f75",
"type": "Wall",
"attributes": {
"element": {
|
- meshblob: It is a compressed mesh format intended to be used in the desktop CAD applications. Internal CAD format of the geometry will be converted into a Bimplus compressed mesh format with the help of a DLL in order to minimize the JSON object. Please use this API call(GET https://api.bimplus.net/v2//objects//geometries/meshblob) for getting the meshblob information of an object.
| Code Block | ||||||||||||||||||||||||||||||||||||||||
|---|---|---|---|---|---|---|---|---|---|---|---|---|---|---|---|---|---|---|---|---|---|---|---|---|---|---|---|---|---|---|---|---|---|---|---|---|---|---|---|---|
| ||||||||||||||||||||||||||||||||||||||||
{
"elementsCount": 1,
"objects": [
|
- threejs: It is a format which is optimized for viewing on mobile devices or in browsers where the native model is filtered and tessellated in order to deliver minimal JSON size and maximal navigation speed (FPS). This model has ThreeJS JSON v 3.1 format and can be directly parsed by the client.Please use this API call(GET https://api.bimplus.net/v2//objects//geometries/threejs) for getting the threejs information of an object.
| Code Block | ||||||||||||||||||||||||||||||||||||||||||||||||||||||||||||||||||||||||||||||||||||||||||||||||||||||||||||||||||||||||||||||||||||||||||||||||||||||||||||||||||||||||||||||||||||||||||||||||||
|---|---|---|---|---|---|---|---|---|---|---|---|---|---|---|---|---|---|---|---|---|---|---|---|---|---|---|---|---|---|---|---|---|---|---|---|---|---|---|---|---|---|---|---|---|---|---|---|---|---|---|---|---|---|---|---|---|---|---|---|---|---|---|---|---|---|---|---|---|---|---|---|---|---|---|---|---|---|---|---|---|---|---|---|---|---|---|---|---|---|---|---|---|---|---|---|---|---|---|---|---|---|---|---|---|---|---|---|---|---|---|---|---|---|---|---|---|---|---|---|---|---|---|---|---|---|---|---|---|---|---|---|---|---|---|---|---|---|---|---|---|---|---|---|---|---|---|---|---|---|---|---|---|---|---|---|---|---|---|---|---|---|---|---|---|---|---|---|---|---|---|---|---|---|---|---|---|---|---|---|---|---|---|---|---|---|---|---|---|---|---|---|---|---|---|
| ||||||||||||||||||||||||||||||||||||||||||||||||||||||||||||||||||||||||||||||||||||||||||||||||||||||||||||||||||||||||||||||||||||||||||||||||||||||||||||||||||||||||||||||||||||||||||||||||||
{
"elementsCount": 1,
"viewbox": {
|
...
| Anchor | ||||
|---|---|---|---|---|
|
Get the project layers and element types. Find the relation between them
| Gliffy Diagram | ||||||||
|---|---|---|---|---|---|---|---|---|
|
A group of element types constitute a layer. But an element type cannot belong to two layers. Both the element types and layers are predefined.
...
- The list of element types can be accessed through this API call(GET https://api-stage.bimplus.net/v2//element-types)
- The list of layers can be accessed through this API call(GET https://api-stage.bimplus.net/v2//element-types/disciplines)
...
| Anchor | ||||
|---|---|---|---|---|
|
Filter the building information using different filter criteria
| Gliffy Diagram | ||||||||
|---|---|---|---|---|---|---|---|---|
|
The "ThreeJS" or the "meshblob" information can be filtered by the layer.
- Please use this API call (GET https://api-stage.bimplus.net/v2/<team>/objects/<object_id>/disciplines/<discipline_id>/geometries/threejs) to get the object tree with selected property list whose geometry type is "ThreeJS" filtered by layer
- Please use this API call (GET https://api-stage.bimplus.net/v2/<team>/objects/<object_id>/disciplines/<discipline_id>/geometries/meshblob) to get the object tree whose geometry type is "compressed geometry mesh (meshblob)" filtered by layer
...
| Anchor | ||||
|---|---|---|---|---|
|
Import an existing
...
model in the form of IFC/SketchUp file
| Gliffy Diagram | ||||||||
|---|---|---|---|---|---|---|---|---|
|
Projects in the form of IFC/SketchUp files can be imported into the Bimplus platform by using the Bimplus Import Service
...
| Anchor | ||||
|---|---|---|---|---|
|
Create and assign issues to projects. Locate/visualize the issues in the project
| Gliffy Diagram | ||||||||
|---|---|---|---|---|---|---|---|---|
|
Any problems or remarks can be reported and assigned to a project in the form of issues. To understand the problem better, comments or attachments can be added to the issue.
- Please use the Bimplus Project Service for creating/deleting an issue or for getting all the issues assigned to a project
- Please use the Bimplus Issue Service for doing all the specific issue related actions
...
- A Pin can be created by using the Bimplus Issue Service (POST https://api-stage.bimplus.net/v2//issues//pins)
- There is also a Bimplus PIN Service available for doing all the specific pin related actions.
...
| Anchor | |||
|---|---|---|---|
|
...
|
Learn about the issue based rights & roles
| Gliffy Diagram |
|---|
...
|
...
|
...
|
Currently Bimplus has a couple of issue based roles (i.e Author, Responsible). Author is the user who creates an issue and the responsible is the one who solves it. Here are some of the conditions that apply for the Bimplus issue tracking.
- An user can create an issue only if he has the rights for editing a project. See the project based rights & roles here
- Issue details can be changed only by the author. An exception to it is the "solution" property of the issue where both the author and responsible can change this property.
- Only the author of the issue can set the issue "Status" to be "Closed". Currently there are three defined issue status: Status, Open & Solved
- Issues can be deleted only by the author of the respective issue
- An email will be sent to the author/responsible/cc when an issue is created/updated/deleted (not implemented)
- Please use the Bimplus Project Service for creating/deleting an issue or for getting all the issues assigned to a project
- Please use the Bimplus Issue Service for doing all the specific issue related actions
...
| Anchor | ||||
|---|---|---|---|---|
|
Add attachments to the whole building as well as to the individual objects
| Gliffy Diagram | ||||||||
|---|---|---|---|---|---|---|---|---|
|
The pictures or any other documents(pdf, ifc etc) can be attached to both the project as well as the individual objects.
- Please use the Bimplus Project Service (POST https://api-stage.bimplus.net/v2/projects/attachments) for adding an attachment to the project.
- Verify whether the picture has been attached to the project using the Bimplus Project Service (GET https://api-stage.bimplus.net/v2/projects/attachments)
- Please use the Bimplus Object Service (POST https://api-stage.bimplus.net/v2/objects/attachments) for adding an attachment to the object.
- Verify whether the picture has been attached to the object using the Bimplus Object Service (GET https://api-stage.bimplus.net/v2/objects/attachments)
...
| Anchor | ||||
|---|---|---|---|---|
|
Find out how many teams I am part of. Remove myself from some of the teams
| Gliffy Diagram | ||||||||
|---|---|---|---|---|---|---|---|---|
|
- Please use the Bimplus Team Management Service (GET https://api-stage.bimplus.net/v2/teams) to get the team list in which you are member of.
- After getting the team list, use the Bimplus Membership Management Service (DELETE https://api-stage.bimplus.net/v2//members/) to delete yourself from some of the teams that you don't want to be part of.
...
| Anchor | ||||
|---|---|---|---|---|
|
Authentication token for multiple services
| Gliffy Diagram | ||||||||
|---|---|---|---|---|---|---|---|---|
|
- Please use the client_id as part of the authentication request. The client_id is a name of another application ,that user wants to use additionally. When user authenticate to another service using SSO, it opens browser UI login page again, it uses cookies and issues token without re-entering credentials. A token will be generated based on the new client_id and cookies which will allow single-signon logins at the same time and increase security because credentials are not entered and transferred many times and the token is only valid for this device and client (Browser, Mobile App).
Obsolete example using internal authentication service, deprecated in 2026:
| Section | ||||
|---|---|---|---|---|
|
| Deck of Cards | |||||||||||||||||||||||||||||||||||||||
|---|---|---|---|---|---|---|---|---|---|---|---|---|---|---|---|---|---|---|---|---|---|---|---|---|---|---|---|---|---|---|---|---|---|---|---|---|---|---|---|
| |||||||||||||||||||||||||||||||||||||||
|
The pictures or any other documents(pdf, ifc etc) can be attached to both the project as well as the individual objects.
- Please use the Bimplus Project Service (POST https://api.bimplus.net/v2//projects//attachments) for adding an attachment to the project.
- Verify whether the picture has been attached to the project using the Bimplus Project Service (GET https://api.bimplus.net/v2//projects//attachments)
- Please use the Bimplus Object Service (POST https://api.bimplus.net/v2//objects/attachments) for adding an attachment to the object.
- Verify whether the picture has been attached to the object using the Bimplus Object Service (GET https://api.bimplus.net/v2//objects//attachments)
...
Find out how many teams I am part of. Remove myself from some of the teams
| Gliffy Diagram | ||||
|---|---|---|---|---|
|
- Please use the Bimplus Team Management Service (GET https://api.bimplus.net/v2/teams) to get the team list in which you are member of.
- After getting the team list, use the Bimplus Membership Management Service (DELETE https://api.bimplus.net/v2//members/) to delete yourself from some of the teams that you don't want to be part of.
...
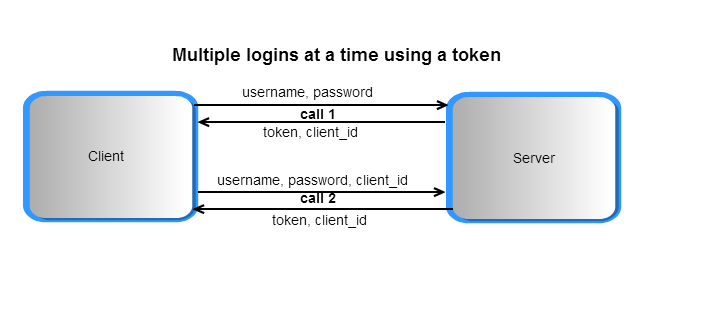
Authentication token for multiple logins and cross client authentication using temporary token
| Gliffy Diagram | ||||
|---|---|---|---|---|
|
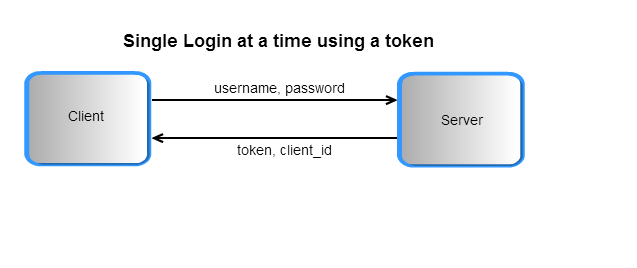
- Please use the client_id as part of the authentication request. The client_id is a unique identifier for the client which is authorizing the user against the API server. The client_id will be generated from the server during the authentication request(Please see the response of the authentication request). A token can be generated based on the client_id and the user_id which will allow multiple logins at the same time and increase security because the token is only valid for this device(Browser, Mobile App).
| Section | ||||
|---|---|---|---|---|
|
- As you see from the above picture, call 1 generates the client_id from the server. Using this client_id, a new token is regenerated using the call 2(using the same API call with client_id as the additional parameter) which can be used for multiple logins at the same time. If the token generated without the client_id is used to login multiple times at the same time, then the second login will cause the logout of the first login.
Example:
| Wiki Markup |
|---|
{deck:id=bimAuthenticateToken} |
| Wiki Markup |
|---|
{card:label=HTTP Method} |
POST
| Wiki Markup |
|---|
{card} |
| Wiki Markup |
|---|
{card:label=URL / Resource / JSON Structure} |
Resource: authorize
URL: https://api.bimplus.net/v2/authorize
JSON Structure:
Name | Mandatory / Optional | Type | Description |
|---|---|---|---|
user_id | mandatory | string | The email address of the user |
password | mandatory | string | The user's password |
client_id | optional | string | The identifier of the used client |
application_id | optional | string | The id of the application |
...
Art-No | App | Platform | UID |
|---|---|---|---|
Editions |
|
|
|
AM00050000 | Bimplus Starter Edition | Cloud | df2dbfa44a2b89704d38e07175be8298 |
|
|
|
|
AM00050050 | Bimplus Business Edition | Cloud | 2efa4c5a58b189e04f0af8879d6c3fca |
|
|
|
|
AM00050100 | Bimplus Enterprise Edition | Cloud | 685b24cf716e211e64f126d5347074e3 |
|
|
|
|
BTW |
|
|
|
AM00050200 | Bimplus TeamWorks | Win | f6c5e0004f0ae73c485324a900a28a14 |
|
|
|
|
Bimplus Apps |
|
|
|
AM0005311 | Bimplus Explorer | iPad | c08181961a0cf078d740f402a18610a1 |
AM0005321 | Bimplus MyHouse Photo | iPad | 13f8972af21a76036717f0e51db64184 |
AM0005331 | Bimplus Problem Spotter | iPad | 13fe742a744959f7f849c30b63bcc4c0 |
AM0005341 | Bimplus Viewer | iPad | c087f3e4f242e974e6ca99f74cc4f6a0 |
|
|
|
|
3rd Party Apps |
|
|
|
|
|
|
|
Bimplus Services |
|
|
|
AM00055000 | Bimplus WebViewer | Browser |
|
|
|
|
|
| Wiki Markup |
|---|
{card} |
| Wiki Markup |
|---|
{card:label=Description} |
| Wiki Markup |
|---|
{card} |
| Wiki Markup | |||||||||||||||||||||||
|---|---|---|---|---|---|---|---|---|---|---|---|---|---|---|---|---|---|---|---|---|---|---|---|
{card:label=Request}
|
| Wiki Markup |
|---|
{card} |
| |||||||||||||||||||||||
| Wiki Markup | |||||||||||||||||||||||
|---|---|---|---|---|---|---|---|---|---|---|---|---|---|---|---|---|---|---|---|---|---|---|---|
{card:label=Response|default=true}
| |||||||||||||||||||||||
{card} |
| Wiki Markup |
|---|
{deck} |
Use the client_id "9fd0bb9d-570b-4719-bfae-93e2f879c19a" to generate a token for multiple logins.
...
| Deck of Cards | ||||
|---|---|---|---|---|
| =
| }
| Wiki Markup |
|---|
{card:label=HTTP Method} |
POST
| Wiki Markup |
|---|
{card} |
| Wiki Markup |
|---|
{card:label=URL / Resource / JSON Structure} |
|
...
...
|
...
| Wiki Markup |
|---|
{card:label=Description} |
...
|
| Wiki Markup |
|---|
{card} |
| ||||||||||||||||||||||||||||||||||
| Wiki Markup | ||||||||||||||||||||||||||||||||||
|---|---|---|---|---|---|---|---|---|---|---|---|---|---|---|---|---|---|---|---|---|---|---|---|---|---|---|---|---|---|---|---|---|---|---|
{card:label=Request|default=true}
| Headers |
|
| Wiki Markup |
|---|
{card} |
| Wiki Markup |
|---|
{card:label=Response} |
| Code Block | ||||||
|---|---|---|---|---|---|---|
| ||||||
Status: 200 OK
|
| Code Block | ||||||
|---|---|---|---|---|---|---|
| ||||||
{
access_token: "c33fa174169e46999fe82fb07fc53e3d"
expires_in: 2591999
client_id: "9fd0bb9d-570b-4719-bfae-93e2f879c19a"
token_type: "BimPlus"
}
|
| Wiki Markup |
|---|
{card} |
| Wiki Markup |
|---|
{deck} |
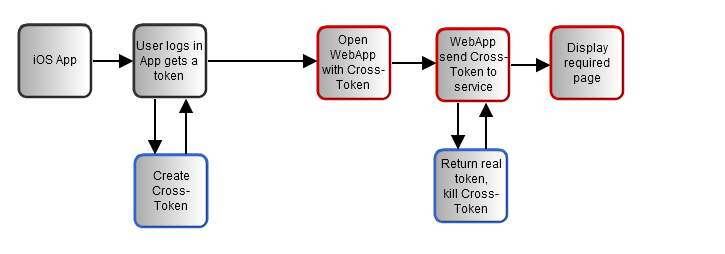
- For switching the client, the cross token service can be used. This service is basically used for requesting a disposable temporary token which will be used for authenticating against different clients. Based on the given authentication token the user is identified and a one time token is generated and returned. This one time cross token is valid only for 5 minutes and is used for logging into the given device/client using cross authentication service . As a result of this call, this one time cross token will be removed but the new token which will be generated can be used in the header for the subsequent API calls.
Here is the cross token workflow:
|
...
| Anchor | ||||
|---|---|---|---|---|
|
Rights & Roles. Relation between User, Team and Project
| Gliffy Diagram | ||||||
|---|---|---|---|---|---|---|
|
Rights vs Roles
| Account / Team Owner | Project Admin | Project Editor | Project Viewer | |
|---|---|---|---|---|
| Create Project | x | |||
| Admin Project (eg. invite) | x | x | ||
| Edit Project | x | x | x | |
| Delete Project | x | x | ||
| View Project | x | x | x | x |
| View all Models | x | x | x | x |
| Create Model | x | x | ||
| Admin Model (eg. invite) | x | x | ||
| Assign User to Model | x | x | ||
| Edit Model | x | x | ||
| Import Data | x | x | ||
| Delete Model | x | x | ||
| View Model | x | x | x | x |
- Please note that the the column names are roles and the horizontal ones are rights.
- There can be many Project Owners although there can be only one Team/Account Owner.
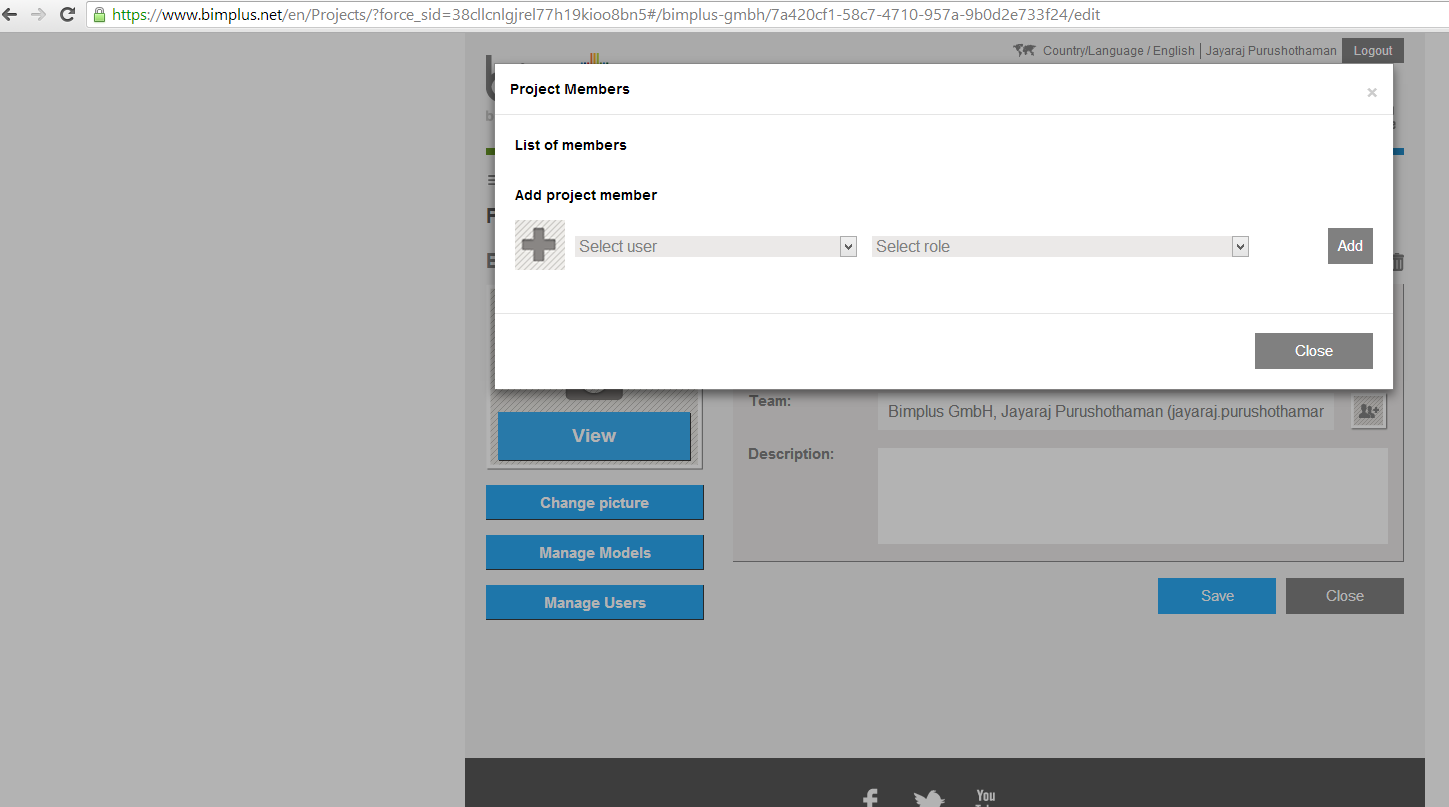
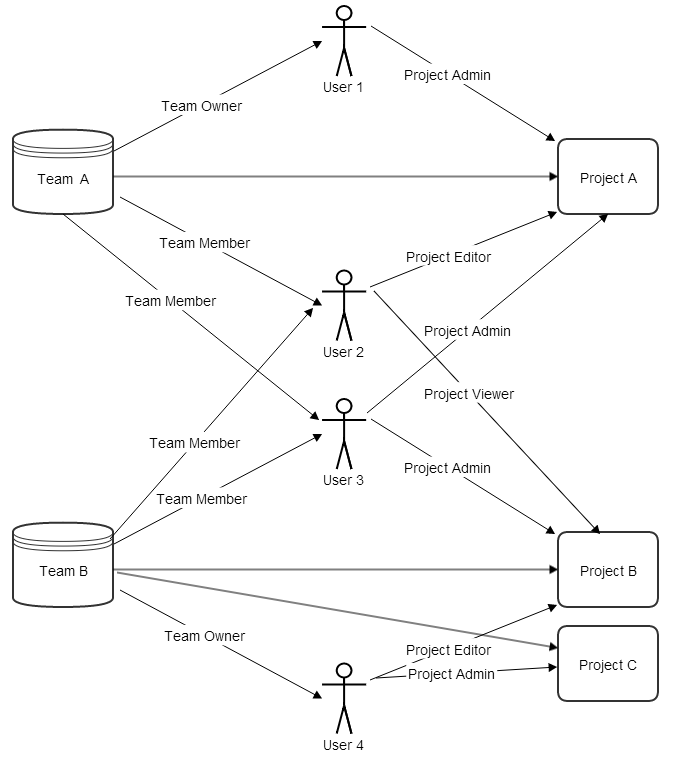
Relation between User, Team & Projects
So, in Bimplus the users have project based roles. After assigning the registered user to a team, the Team Owner or the Project Admin of that particular project has to send an invitation (via portal. See the picture below) to the user who belongs to one of his team.