| Composition Setup |
|---|
|
| Note |
|---|
Help us improve the Bimplus API doc by providing your valuable comments. You can find the comment section at the bottom of the page. |
...
Connect with Bimplus. Relation(workflow) between Bimplus portal and Bimplus api
| Gliffy Diagram | ||||||||
|---|---|---|---|---|---|---|---|---|
|
-
is the first place of contact of the user/developer for using the Bimplus platform(stage version). The production version of the portal can be found underNewwindowlink title Bimplus portal url https://www-stage.bimplus.net
where you can purchase different editions of Bimplus cloud platform.Newwindowlink title shop url https://www.bimplus.net/en/products/
you can also find a few critical foundation apps like the Bimplus Explorer, Bimplus Viewer and Bimplus Problem Spotter. The portal takes care of the user registration(developer registration) as well.Newwindowlink title Here url https://www.bimplus.net/en/Home-oxid/bim-Apps/ - The Bimplus API(development version url : https://api-stage.bimplus.net/v2) provides an interface for accessing the building information and models. It connects the building project information to a vast number of developers providing innovative Apps / applications that can operate on the building models and information.
...
Become a Bimplus compliant developer/partner. Register and authorize yourself to access the Bimplus resources. Relation between teams and projects
| Gliffy Diagram | ||||||||
|---|---|---|---|---|---|---|---|---|
|
- Please register
for accessing the Bimplus resources and become a Bimplus compliant developer and a partner. You will receive an authentication token after the registration.Newwindowlink title here url https://www-stage.bimplus.net - A Team is a tenant/company which work on the projects. The team has to be specified and setup through the
portal as so calledNewwindowlink title bimplus url https://www-stage.bimplus.net
to present aNewwindowlink title slugs url http://en.wikipedia.org/wiki/Clean_URL
. The team slug will be used to know which tenant database to work on.Newwindowlink title clean URL url http://en.wikipedia.org/wiki/Clean_URL - Using the authentication token and the team slug, you can start working with the building projects which you are a member of, using our Bimplus api.
- Please find a quick start tutorial
.Newwindowlink title here url 1.2+Quick+Start
...
Create a team. Create an user. Assign the newly created user to the newly created team. Verify whether he/she is part of the team
| Gliffy Diagram | ||||||||
|---|---|---|---|---|---|---|---|---|
|
The Bimplus provides a few user administration relevant services. They are:
...
- User Management Service
- Team Management Service
- Membership Management Service
- Please use the Bimplus Team Management Service (POST https://api-stage.bimplus.net/v2/teams) for creating a team. This will basically create a data storage for the team. See in the Request/Response tab where we have created the "best-company" team. Also, please note that the team slug "best-company" will be part of the subsequent requests for accessing the resources and performing the desired actions on them.
...
- Verify whether the user has been added to the team by using the Bimplus Membership Management Service(GET https://api-stage.bimplus.net/v2//members). In the response tab, you can see the user(test@bimplus.net) who is part of the "best-company" team.
- For authorization, user should perform OIDC authentication and receive token (preferrably within browser UI)
...
| Anchor | ||||
|---|---|---|---|---|
|
Create, modify and access different resources/objects of the building model using the Bimplus api
| Gliffy Diagram | ||||||||
|---|---|---|---|---|---|---|---|---|
|
The project slug (which should be provided during the creation of a project) should be provided as part of the URL for accessing all the project relevant resources. This is also necessary to verify the user’s access rights on the project in an early stage of processing the API call (before any business data will be touched and any business logic will be executed)
...
Create a project, add an object(wall) and view it using the web viewer
| Gliffy Diagram | ||||||||
|---|---|---|---|---|---|---|---|---|
|
1. Create a new project
Use the Bimplus Project Service for creating a new project.
| Deck of Cards | |||||||||||||||||||||||||||||||||||||||||||||||||||||||||||||||||||||||||||||||
|---|---|---|---|---|---|---|---|---|---|---|---|---|---|---|---|---|---|---|---|---|---|---|---|---|---|---|---|---|---|---|---|---|---|---|---|---|---|---|---|---|---|---|---|---|---|---|---|---|---|---|---|---|---|---|---|---|---|---|---|---|---|---|---|---|---|---|---|---|---|---|---|---|---|---|---|---|---|---|---|
| |||||||||||||||||||||||||||||||||||||||||||||||||||||||||||||||||||||||||||||||
|
...
| Deck of Cards | |||||||||||||||||||||||||||||||||||||||||||||||||||||||||||||||||||||||||||||||||||||||
|---|---|---|---|---|---|---|---|---|---|---|---|---|---|---|---|---|---|---|---|---|---|---|---|---|---|---|---|---|---|---|---|---|---|---|---|---|---|---|---|---|---|---|---|---|---|---|---|---|---|---|---|---|---|---|---|---|---|---|---|---|---|---|---|---|---|---|---|---|---|---|---|---|---|---|---|---|---|---|---|---|---|---|---|---|---|---|---|
| |||||||||||||||||||||||||||||||||||||||||||||||||||||||||||||||||||||||||||||||||||||||
|
...
| Deck of Cards | |||||||||||||||||||||||||||||||||||||||||||||||||||||||||||||||||||||||||||||||||||
|---|---|---|---|---|---|---|---|---|---|---|---|---|---|---|---|---|---|---|---|---|---|---|---|---|---|---|---|---|---|---|---|---|---|---|---|---|---|---|---|---|---|---|---|---|---|---|---|---|---|---|---|---|---|---|---|---|---|---|---|---|---|---|---|---|---|---|---|---|---|---|---|---|---|---|---|---|---|---|---|---|---|---|---|
| |||||||||||||||||||||||||||||||||||||||||||||||||||||||||||||||||||||||||||||||||||
|
...
6. See your result visually by using the web viewer.

...
| Anchor | ||||
|---|---|---|---|---|
|
Get the list of available projects and its properties
| Gliffy Diagram | ||||||||
|---|---|---|---|---|---|---|---|---|
|
- This API call(GET https://api-stage.bimplus.net/v2//projects) should retrieve the list of projects available to the team. In this call, only a few properties of the projects will be visible.
...
Add a thumbnail to the project
| Gliffy Diagram | ||||||||
|---|---|---|---|---|---|---|---|---|
|
- Thumbnail can be added to a project by using the Bimplus Project Service(POST https://api-stage.bimplus.net/v2//projects//thumbnail). There is also a service available for downloading the thumbnail.
...
Add properties to the project
| Gliffy Diagram | ||||||||
|---|---|---|---|---|---|---|---|---|
|
- The project can be updated with the necessary attributes. The list of available Bimplus attributes can be seen here
...
| Deck of Cards | ||||||||||||||||||||||||||||||||||||||||||||||||||||||||||||||||||||||||||
|---|---|---|---|---|---|---|---|---|---|---|---|---|---|---|---|---|---|---|---|---|---|---|---|---|---|---|---|---|---|---|---|---|---|---|---|---|---|---|---|---|---|---|---|---|---|---|---|---|---|---|---|---|---|---|---|---|---|---|---|---|---|---|---|---|---|---|---|---|---|---|---|---|---|---|
| ||||||||||||||||||||||||||||||||||||||||||||||||||||||||||||||||||||||||||
|
...
- See the updated project properties
| Deck of Cards | ||||||||||||||||||||||||||||||||||||||||||||||||||||||
|---|---|---|---|---|---|---|---|---|---|---|---|---|---|---|---|---|---|---|---|---|---|---|---|---|---|---|---|---|---|---|---|---|---|---|---|---|---|---|---|---|---|---|---|---|---|---|---|---|---|---|---|---|---|---|
| ||||||||||||||||||||||||||||||||||||||||||||||||||||||
|
...
| Anchor | ||||
|---|---|---|---|---|
|
Project topology and object topology tree
| Gliffy Diagram | ||||||||
|---|---|---|---|---|---|---|---|---|
|
Topology is a hierarchical tree representing all its child nodes. A topology tree consist of components which can have a graphical representation(objects or elements) or components which does not have a graphical representation(nodes). A topology tree can be obtained both on the project as well as on the object level.
...
Find the geometry of an object. Get to know the types of geometry available
| Gliffy Diagram | ||||||||
|---|---|---|---|---|---|---|---|---|
|
The geometrical information(graphical representation) of a building can be accessed through the Bimplus Object Service. There are different types of geometry available for optimizing and viewing on different devices.
...
Get the different properties / structure(normal, viewer properties, object in hierarchical tree structure) of the object using different property combinations
| Gliffy Diagram | ||||||
|---|---|---|---|---|---|---|
|
Different properties / structure (normal, viewer properties, object in hierarchical tree structure) of the object can be obtained using different property combinations.
...
Get the project layers and element types. Find the relation between them
| Gliffy Diagram | ||||||||
|---|---|---|---|---|---|---|---|---|
|
A group of element types constitute a layer. But an element type cannot belong to two layers. Both the element types and layers are predefined.
...
Filter the building information using different filter criteria
| Gliffy Diagram | ||||||||
|---|---|---|---|---|---|---|---|---|
|
The "ThreeJS" or the "meshblob" information can be filtered by the layer.
...
Import an existing model in the form of IFC/SketchUp file
| Gliffy Diagram | ||||||||
|---|---|---|---|---|---|---|---|---|
|
Projects in the form of IFC/SketchUp files can be imported into the Bimplus platform by using the Bimplus Import Service
...
Create and assign issues to projects. Locate/visualize the issues in the project
| Gliffy Diagram | ||||||||
|---|---|---|---|---|---|---|---|---|
|
Any problems or remarks can be reported and assigned to a project in the form of issues. To understand the problem better, comments or attachments can be added to the issue.
...
Learn about the issue based rights & roles
| Gliffy Diagram | ||||||
|---|---|---|---|---|---|---|
|
Currently Bimplus has a couple of issue based roles (i.e Author, Responsible). Author is the user who creates an issue and the responsible is the one who solves it. Here are some of the conditions that apply for the Bimplus issue tracking.
...
Add attachments to the whole building as well as to the individual objects
| Gliffy Diagram | ||||||||
|---|---|---|---|---|---|---|---|---|
|
The pictures or any other documents(pdf, ifc etc) can be attached to both the project as well as the individual objects.
...
Find out how many teams I am part of. Remove myself from some of the teams
| Gliffy Diagram | ||||||||
|---|---|---|---|---|---|---|---|---|
|
- Please use the Bimplus Team Management Service (GET https://api-stage.bimplus.net/v2/teams) to get the team list in which you are member of.
...
| Anchor | ||||
|---|---|---|---|---|
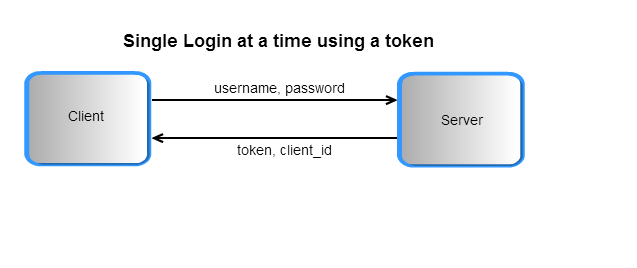
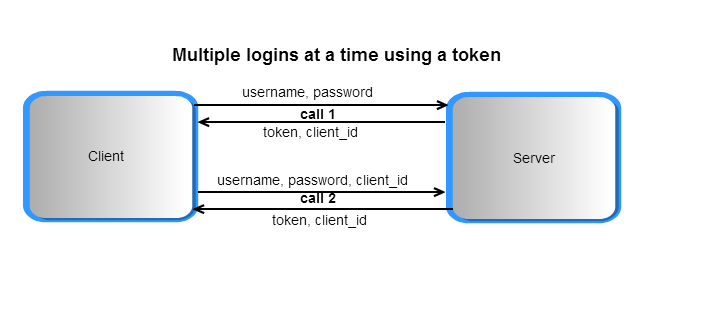
|
Authentication token for multiple
...
services
| Gliffy Diagram | ||||||
|---|---|---|---|---|---|---|
| ||||||
| Gliffy Diagram | ||||||
|
- Please use the client_id as part of the authentication request. The client_id is a unique identifier for the client which is authorizing the user against the API server. The client_id will be generated from the server during the authentication request(Please see the response of the authentication request). A token can name of another application ,that user wants to use additionally. When user authenticate to another service using SSO, it opens browser UI login page again, it uses cookies and issues token without re-entering credentials. A token will be generated based on the new client_id and the user_id cookies which will allow multiple single-signon logins at the same time and increase security because credentials are not entered and transferred many times and the token is only valid for this device and client (Browser, Mobile App).
| Section | ||||
|---|---|---|---|---|
|
...
Example:
| Deck of Cards | |||||||||||||||||||||||||||||||||||||||||||||||||||||||||||||||||||||||||||||||||||
|---|---|---|---|---|---|---|---|---|---|---|---|---|---|---|---|---|---|---|---|---|---|---|---|---|---|---|---|---|---|---|---|---|---|---|---|---|---|---|---|---|---|---|---|---|---|---|---|---|---|---|---|---|---|---|---|---|---|---|---|---|---|---|---|---|---|---|---|---|---|---|---|---|---|---|---|---|---|---|---|---|---|---|---|
| |||||||||||||||||||||||||||||||||||||||||||||||||||||||||||||||||||||||||||||||||||
|
Use the client_id "9fd0bb9d-570b-4719-bfae-93e2f879c19a" to generate a token for multiple logins.
| Deck of Cards | |||||||||||||||||||||||||||||||||||||||||||||||||||||||||||||||||||||||||||||||||||
|---|---|---|---|---|---|---|---|---|---|---|---|---|---|---|---|---|---|---|---|---|---|---|---|---|---|---|---|---|---|---|---|---|---|---|---|---|---|---|---|---|---|---|---|---|---|---|---|---|---|---|---|---|---|---|---|---|---|---|---|---|---|---|---|---|---|---|---|---|---|---|---|---|---|---|---|---|---|---|---|---|---|---|---|
| |||||||||||||||||||||||||||||||||||||||||||||||||||||||||||||||||||||||||||||||||||
|
- For switching the client, the cross token service can be used. This service is basically used for requesting a disposable temporary token which will be used for authenticating against different clients. Based on the given authentication token the user is identified and a one time token is generated and returned. This one time cross token is valid only for 5 minutes and is used for logging into the given device/client using cross authentication service . As a result of this call, this one time cross token will be removed but the new token which will be generated can be used in the header for the subsequent API calls.
Here is the cross token workflow:
...
...
| Anchor | ||||
|---|---|---|---|---|
|
Rights & Roles. Relation between User, Team and Project
| Gliffy Diagram | ||||||
|---|---|---|---|---|---|---|
|
Rights vs Roles
...
| Account / Team Owner | Project Admin | Project Editor | Project Viewer | |
|---|---|---|---|---|
| Create Project | x |
| Admin Project (eg. invite) | x | x |
| Edit Project | x | x | x |
| Delete Project | x | x |
| View Project | x | x | x | x |
| View all Models | x | x | x | x |
| Create Model | x | x |
| Admin Model (eg. invite) | x | x |
| Assign User to Model | x | x |
| Edit Model | x | x |
| Import Data | x | x |
| Delete Model | x | x |
| View Model | x | x | x | x |
- Please note that the the column names are roles and the horizontal ones are rights.
- There can be many Project Owners although there can be only one Team/Account Owner.
Relation between User, Team & Projects
...
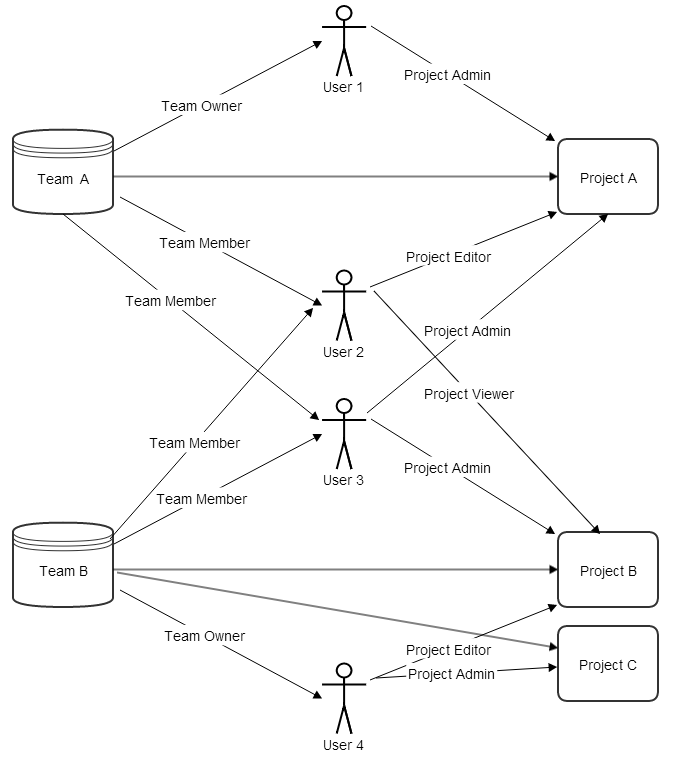
So, in Bimplus the users have project based roles. After assigning the registered user to a team, the Team Owner or the Project Admin of that particular project has to send an invitation (via portal. See the picture below) to the user who belongs to one of his team.
...