...
| Info |
|---|
Developers please use | Newwindowlink |
|---|
| title | https://api-stage.bimplus.net/v2 |
|---|
| url | https://api-stage.bimplus.net/v2 |
|---|
|
(stage version of Bimplus API) and | Newwindowlink |
|---|
| title | http://portal-stage.bimplus.net/ |
|---|
| url | http://portal-stage.bimplus.net/ |
|---|
|
(stage version of Shop/Portal) for testing purposes. The production version of the portal is located under | Newwindowlink |
|---|
| title | https://portal.bimplus.net/ |
|---|
| url | https://portal.bimplus.net/ |
|---|
|
and the base url of the API is different for the production version. |
Connect with Bimplus. Relation(workflow) between Bimplus portal and Bimplus api
Become a Bimplus compliant developer/partner. Register and authorize yourself to access the Bimplus resources. Relation between teams and projects
Create a team. Create an user. Assign the newly created user to the newly created team. Verify whether he/she is part of the team
Create, modify and access different resources/objects of the building model using the Bimplus api
What is a Project & Model in Bimplus. How it can be created?
Create a project, add an object(wall) and view it using the web viewer
Get the list of available projects and its properties
Add properties to the project
Add a thumbnail to the project
Project topology and object topology tree
Find the geometry of an object. Get to know the types of geometry available
Get the different properties / structure(normal, viewer properties, object in hierarchical tree structure) of the object using different property combinations
Get the project layers and element types. Find the relation between them
Filter the building information using different filter criteria
Import an existing model in the form of IFC/SketchUp file
Create and assign issues to projects. Locate/visualize the issues in the project
Learn about the issue based rights & roles
Add attachments to the whole building as well as to the individual objects
Find out how many teams I am part of. Remove myself from some of the teams
Authentication token for multiple logins and cross client authentication using temporary token
Rights & Roles. Relation between User, Team and Project
...
| Anchor |
|---|
| storyAPIPortal |
|---|
| storyAPIPortal |
|---|
|
Connect with Bimplus. Relation(workflow) between Bimplus portal and Bimplus api
...
| Anchor |
|---|
| storyAuthorize |
|---|
| storyAuthorize |
|---|
|
Become a Bimplus compliant developer/partner. Register and authorize yourself to access the Bimplus resources. Relation between teams and projects
| Gliffy Diagram |
|---|
| size | L |
|---|
| name | US_Register_Compliance |
|---|
|
...
| Anchor |
|---|
| storyCreateUser |
|---|
| storyCreateUser |
|---|
|
Create a team. Create an user. Assign the newly created user to the newly created team. Verify whether he/she is part of the team
...
| Anchor |
|---|
| storyBimplusApi |
|---|
| storyBimplusApi |
|---|
|
Create, modify and access different resources/objects of the building model using the Bimplus api
...
| Anchor |
|---|
| storyCreateProject |
|---|
| storyCreateProject |
|---|
|
Create a project, add an object(wall) and view it using the web viewer
| Gliffy Diagram |
|---|
| size | L |
|---|
| name | US_Create_Project |
|---|
|
1. Create a new project
Use the Bimplus Project Service for creating a new project.
| Deck of Cards |
|---|
|
| Card |
|---|
| label | URL / Resource / JSON Structure |
|---|
| | Resource: projects URL: https://api-stage.bimplus.net/v2/<team>/projects Example: https://api-stage.bimplus.net/v2/bimplus-gmbh/projects JSON Structure: Name | Mandatory / Optional | Type | Description |
|---|
name | optional | string | Name of the project | shortDescr | optional | string | Short description of the project | created | will be ignored | string (date) | Creation date of the project |
|
| Card |
|---|
| | Creates a new project. |
| Card |
|---|
| | Code Block |
|---|
| borderColor | Green |
|---|
| lang | xml |
|---|
| title | Headers |
|---|
| Authorization: BimPlus 9c1874a62c974dcfa75e0132c423a088
Content-Type: application/json
|
| Code Block |
|---|
| borderColor | Red |
|---|
| lang | xml |
|---|
| title | JSON |
|---|
| {
"name" : "Your Wonderful Model",
"shortDescr" : "The best building model in the world"
}
|
|
| Card |
|---|
| | Code Block |
|---|
| borderColor | Green |
|---|
| lang | xml |
|---|
| title | Status |
|---|
| Status: 201 Created
|
| Code Block |
|---|
| borderColor | Red |
|---|
| lang | xml |
|---|
| title | JSON |
|---|
| {
"name": "Your Wonderful Model",
"shortDescr": "The best building model in the world",
"teamName": "Bimplus GmbH",
"teamSlug": "bimplus-gmbh",
"hasWriteAccess": true,
"thumbnail": null,
"created": "2014-01-30T15:43:55.1302187Z",
"changed": "2014-01-30T15:43:55.1302187Z",
"disciplines": null,
"id": "69e48f92-a8dc-4af5-8f71-187b40a8b8f5"
} |
|
|
2. Create a model under the project
| Deck of Cards |
|---|
|
| Card |
|---|
| default | true |
|---|
| label | URL / Resource / JSON Structure |
|---|
| | Resource: divisions URL: https://api-stage.bimplus.net/v2/<team_slug>/projects/<project_id>/divisions Example: https://api-stage.bimplus.net/v2/bimplus/projects/69e48f92-a8dc-4af5-8f71-187b40a8b8f5/divisions JSON Structure: Name | Mandatory / Optional | Type | Description |
|---|
name | mandatory | string | Name of the model | description | optional | string | Short description of the model | projectId | will be ignored | string (guid) | Id of the project to which the model belongs | | topologyId | optional | string (guid) | Id of the topology to which the model belongs | | disciplines | optional | object | The discipline list of the model |
|
| Card |
|---|
| | Creates a new model. |
| Card |
|---|
| | Code Block |
|---|
| borderColor | Green |
|---|
| lang | xml |
|---|
| title | Headers |
|---|
| Authorization: BimPlus 9c1874a62c974dcfa75e0132c423a088
Content-Type: application/json
|
| Code Block |
|---|
| borderColor | Red |
|---|
| lang | xml |
|---|
| title | JSON |
|---|
| {
"name" : "Nemetschek Building",
"shortDescr" : "Model created via API"
} |
|
| Card |
|---|
| | Code Block |
|---|
| borderColor | Green |
|---|
| lang | xml |
|---|
| title | Status |
|---|
| Status: 201 Created
|
| Code Block |
|---|
| borderColor | Red |
|---|
| lang | xml |
|---|
| title | JSON |
|---|
| {
"name": "Nemetschek Building",
"description": null,
"projectId": "69e48f92-a8dc-4af5-8f71-187b40a8b8f5",
"id": "4496b8ad-ba5a-483c-9912-2cb837178708"
} |
|
|
3. Create a topology node
A Topology node has to be created for adding the objects (Column, Wall). As a topology node is also an object, the Bimplus Object Service has to be used for creating the topology object. Please see the request tab. The id of the project is provided as the parent of the topology node object. The model id has to be provided as the "divisionid" attribute.
| Deck of Cards |
|---|
|
| Card |
|---|
| label | URL / Resource / JSON Structure |
|---|
| | Resource: objects URL: https://api-stage.bimplus.net/v2/<team>/objects Example: https://api-stage.bimplus.net/v2/bimplus/objects JSON Structure: Name | Mandatory / Optional | Type | Description |
|---|
parent | optional | string (guid) | The id of the parent to which the object can be associated | type | mandatory | string | Element type of the object | attributes | optional | string | Attributes of the object | children | optional | Object | Children of the object |
|
| Card |
|---|
| | Creates a new object |
| Card |
|---|
| | Code Block |
|---|
| borderColor | Green |
|---|
| lang | xml |
|---|
| title | Headers |
|---|
| Authorization: BimPlus 9c1874a62c974dcfa75e0132c423a088
Content-Type: application/json
|
| Code Block |
|---|
| borderColor | Red |
|---|
| lang | xml |
|---|
| title | JSON |
|---|
| {
"parent": "69e48f92-a8dc-4af5-8f71-187b40a8b8f5",
"type": "TopologyDivision",
"attributes": {
"element": {
"isparent": true,
"elementtyp": "e003e080-f21b-4f8a-8c4c-4c9c5026cf50",
"divisionid": "4496b8ad-ba5a-483c-9912-2cb837178708"
},
"general": {
"name": "created by objects post",
"isobjectvalid": true
}
}
} |
|
| Card |
|---|
| | Code Block |
|---|
| borderColor | Green |
|---|
| lang | xml |
|---|
| title | Status |
|---|
| Status: 201 Created
|
| Code Block |
|---|
| borderColor | Red |
|---|
| lang | xml |
|---|
| title | JSON |
|---|
| {
"id": "b793c860-d3b8-48a5-aa42-9df9e24a0d71",
"parent": "69e48f92-a8dc-4af5-8f71-187b40a8b8f5",
"type": "TopologyDivision",
"attributes": {
"element": {
"isparent": true,
"elementtyp": "e003e080-f21b-4f8a-8c4c-4c9c5026cf50",
"divisionid": "4496b8ad-ba5a-483c-9912-2cb837178708",
"logparentid": "69e48f92-a8dc-4af5-8f71-187b40a8b8f5"
},
"general": {
"name": "created by objects post",
"isobjectvalid": true
}
}
} |
|
|
4. Add a wall to the project
Again we use the Bimplus Object Service for creating the wall object in the project. Please note that the wall is added to the topology node and not the project (i.e See the request tab. The id of the topology node is provided for the parent attribute of the json object(wall))
| Deck of Cards |
|---|
|
| Card |
|---|
| label | URL / Resource / JSON Structure |
|---|
| | Resource: objects URL: https://api-stage.bimplus.net/v2/<team>/objects Example: https://api-stage.bimplus.net/v2/bimplus/objects JSON Structure: Name | Mandatory / Optional | Type | Description |
|---|
parent | optional | string (guid) | The id of the parent to which the object can be associated | type | mandatory | string | Element type of the object | attributes | optional | string | Attributes of the object | children | optional | Object | Children of the object |
|
| Card |
|---|
| | Creates a new object |
| Card |
|---|
| | Code Block |
|---|
| borderColor | Green |
|---|
| lang | xml |
|---|
| title | Headers |
|---|
| Authorization: BimPlus 9c1874a62c974dcfa75e0132c423a088
Content-Type: application/json
|
| Code Block |
|---|
| borderColor | Red |
|---|
| lang | xml |
|---|
| title | JSON |
|---|
| {
"parent": "b793c860-d3b8-48a5-aa42-9df9e24a0d71",
"type": "Wall",
"attributes": {
"element": {
"elementtyp": "10074eef-9418-4d64-9c6d-23932835a7f1",
"divisionid": "4496b8ad-ba5a-483c-9912-2cb837178708"
},
"general": {
"name": "a new test wall without walllayer"
},
"quantity": {
"width": 100,
"volume": 200.4
},
"geometry": {
"mesh": {
"color": 4291407461,
"vertices": [
-3486.667,
0,
-3000,
8993.333,
0,
-3000,
8993.333,
300,
-3000,
-3486.667,
300,
-3000,
-3486.667,
0,
-400,
8993.333,
0,
-400,
8993.333,
300,
-400,
-3486.667,
300,
-400
],
"faces": [
4,
3,
0,
1,
2,
4,
4,
7,
6,
5,
4,
0,
3,
7,
4,
4,
1,
0,
4,
5,
4,
2,
1,
5,
6,
4,
3,
2,
6,
7
]
}
}
}
} |
|
| Card |
|---|
| | Code Block |
|---|
| borderColor | Green |
|---|
| lang | xml |
|---|
| title | Status |
|---|
| Status: 201 Created
|
| Code Block |
|---|
| borderColor | Red |
|---|
| lang | xml |
|---|
| title | JSON |
|---|
| {
"id": "b2a92252-ae51-4c72-ab1e-fafa141ac54c",
"parent": "b793c860-d3b8-48a5-aa42-9df9e24a0d71",
"type": "Wall",
"attributes": {
"element": {
"elementtyp": "10074eef-9418-4d64-9c6d-23932835a7f1",
"divisionid": "4496b8ad-ba5a-483c-9912-2cb837178708",
"logparentid": "69e48f92-a8dc-4af5-8f71-187b40a8b8f5"
},
"general": {
"name": "a new test wall without walllayer"
},
"quantity": {
"width": 100,
"volume": 200.4
},
"geometry": {
"mesh": {
"color": 4291407461,
"vertices": [
-3486.667,
0,
-3000,
8993.333,
0,
-3000,
8993.333,
300,
-3000,
-3486.667,
300,
-3000,
-3486.667,
0,
-400,
8993.333,
0,
-400,
8993.333,
300,
-400,
-3486.667,
300,
-400
],
"faces": [
4,
3,
0,
1,
2,
4,
4,
7,
6,
5,
4,
0,
3,
7,
4,
4,
1,
0,
4,
5,
4,
2,
1,
5,
6,
4,
3,
2,
6,
7
]
}
},
"elementstate": {
"state": "0aaf5a1c-2453-40cb-9232-315119dd288f"
}
}
} |
|
|
5. Verify whether the wall and column is added to the project by seeing the object topology
For verifying whether the wall and the column is added to the project, we have to call GET https://api-stage.bimplus.net/v2/nemetschek/objects//topology. Please note that the API call GET https://api-stage.bimplus.net/v2/nemetschek/projects//topology will only give you its children (i.e topology) details. So, if your project is very big, you can first call GET https://api-stage.bimplus.net/v2/nemetschek/projects//topology and get the topology id(i.e 7f76a497-e322-4b78-b820-1ce85ebc39db in our example). Using the topology id we can get the object(wall, column in our case) details using the call GET https://api-stage.bimplus.net/v2/nemetschek/objects/7f76a497-e322-4b78-b820-1ce85ebc39db/topology.
| Deck of Cards |
|---|
|
| Card |
|---|
| label | URL / Resource / JSON Structure |
|---|
| | Resource: objects/<object_id>/topology URL: https://api-stage.bimplus.net/v2/<team>/objects/<object_id>/topology Example: https://api-stage.bimplus.net/v2/bimplus-gmbh/objects/69e48f92-a8dc-4af5-8f71-187b40a8b8f5/topology |
| Card |
|---|
| | Get all the project properties of a project using its id. |
| Card |
|---|
| | Code Block |
|---|
| borderColor | Green |
|---|
| lang | xml |
|---|
| title | Headers |
|---|
| Authorization: BimPlus 9c1874a62c974dcfa75e0132c423a088
Content-Type: application/json
|
|
| Card |
|---|
| | Code Block |
|---|
| borderColor | Green |
|---|
| lang | xml |
|---|
| title | Status |
|---|
| Status: 200 OK
|
| Code Block |
|---|
| borderColor | Red |
|---|
| lang | xml |
|---|
| title | JSON |
|---|
| {
"parent": null,
"name": "Your Wonderful Model",
"type": "ID_Project",
"children": [
{
"parent": "69e48f92-a8dc-4af5-8f71-187b40a8b8f5",
"name": "created by objects post",
"type": "ID_TopologyDivision",
"children": [
{
"parent": "b793c860-d3b8-48a5-aa42-9df9e24a0d71",
"name": "a new test wall without walllayer",
"type": "ID_ArchWall",
"children": [],
"id": "b2a92252-ae51-4c72-ab1e-fafa141ac54c"
}
],
"id": "b793c860-d3b8-48a5-aa42-9df9e24a0d71"
}
],
"id": "69e48f92-a8dc-4af5-8f71-187b40a8b8f5"
} |
|
|
6. See your result visually by using the web viewer.

...
| Anchor |
|---|
| storyProjectList |
|---|
| storyProjectList |
|---|
|
Get the list of available projects and its properties
...
| Anchor |
|---|
| storyThumbnail |
|---|
| storyThumbnail |
|---|
|
Add a thumbnail to the project
...
| Anchor |
|---|
| storyAddProperties |
|---|
| storyAddProperties |
|---|
|
Add properties to the project
| Gliffy Diagram |
|---|
| size | L |
|---|
| name | US_AddProperties |
|---|
|
...
| Anchor |
|---|
| storyTopologyTree |
|---|
| storyTopologyTree |
|---|
|
Project topology and object topology tree
...
| Anchor |
|---|
| storyGeometry |
|---|
| storyGeometry |
|---|
|
Find the geometry of an object. Get to know the types of geometry available
...
| Anchor |
|---|
| storyObjectWithDifferentProps |
|---|
| storyObjectWithDifferentProps |
|---|
|
Get the different properties / structure(normal, viewer properties, object in hierarchical tree structure) of the object using different property combinations
| Gliffy Diagram |
|---|
| name | US_ObjectWithDiffProps |
|---|
|
...
| Anchor |
|---|
| storyDisciplines |
|---|
| storyDisciplines |
|---|
|
Get the project layers and element types. Find the relation between them
...
| Anchor |
|---|
| storyFilters |
|---|
| storyFilters |
|---|
|
...
...
Create and assign issues to projects. Locate/visualize the issues in the project
...
| Anchor |
|---|
| storyIssueRightsRoles |
|---|
| storyIssueRightsRoles |
|---|
|
Learn about the issue based rights & roles
...
- An user can create an issue only if he has the rights for editing a project. See the project based rights & roles here
- Issue details can be changed only by the author. An exception to it is the "solution" property of the issue where both the author and responsible can change this property.
- Only the author of the issue can set the issue "Status" to be "Closed". Currently there are three defined issue status: Status, Open & Solved
- Issues can be deleted only by the author of the respective issue
- An email will be sent to the author/responsible/cc when an issue is created/updated/deleted (not implemented)
...
| Anchor |
|---|
| storyAttachments |
|---|
| storyAttachments |
|---|
|
Add attachments to the whole building as well as to the individual objects
...
| Anchor |
|---|
| storyTeamList |
|---|
| storyTeamList |
|---|
|
Find out how many teams I am part of. Remove myself from some of the teams
...
| Anchor |
|---|
| storyCrossToken |
|---|
| storyCrossToken |
|---|
|
| Gliffy Diagram |
|---|
| size | L |
|---|
| name | US_Cross_Authentication |
|---|
|
...
| Anchor |
|---|
| storyRights&Roles |
|---|
| storyRights&Roles |
|---|
|
Rights & Roles. Relation between User, Team and Project
Rights vs Roles
| | Account / Team
Owner | Project
Admin | Project
Editor | Project
Viewer |
|---|
| Create Project | x | | | |
| Admin Project (eg. invite) | x | x | | |
| Edit Project | x | x | x | |
| Delete Project | x | x | | |
| View Project | x | x | x | x |
| | | | | |
| View all Models | x | x | x | x |
| Create Model | x | x | | |
| Admin Model (eg. invite) | x | x | | |
| Assign User to Model | x | x | | |
| Edit Model | x | x | | |
| Import Data | x | x | | |
| Delete Model | x | x | | |
| View Model | x | x | x | x |
- Please note that the the column names are roles and the horizontal ones are rights.
- There can be many Project Owners although there can be only one Team/Account Owner.
Relation between User, Team & Projects
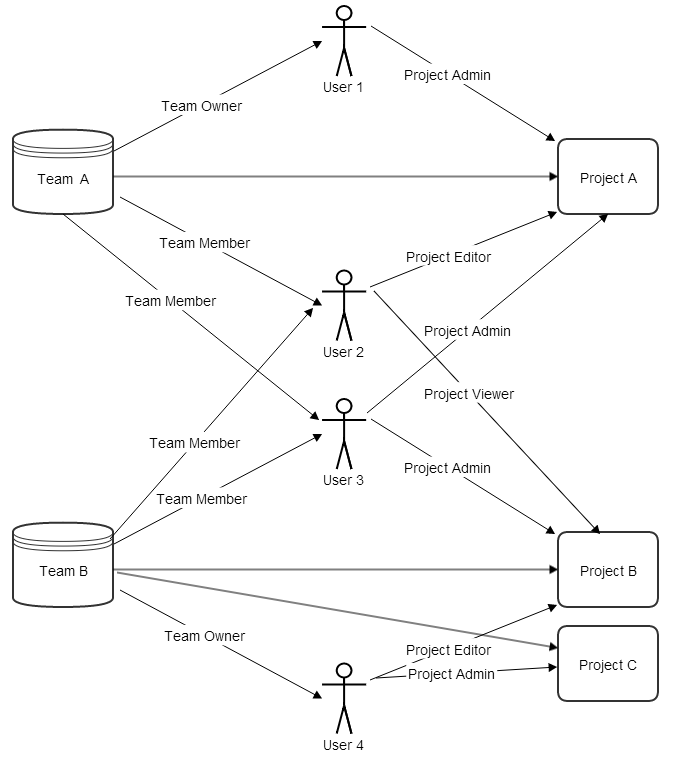
So, in Bimplus the users have project based roles. After assigning the registered user to a team, the Team Owner or the Project Admin of that particular project has to send an invitation (via portal. See the picture below) to the user who belongs to one of his team.
...